Welcome, fellow bread enthusiasts! Today, we’re embarking on a journey to create something truly special: a classic homemade bread. There’s nothing quite like the aroma of freshly baked bread wafting through your home, filling it with warmth and comfort. This recipe isn’t just about making bread; it’s about creating an experience, a connection to a tradition that spans generations.
This classic homemade bread recipe is more than just a set of instructions; it’s a gateway to a world of culinary possibilities. It’s the foundation upon which countless sandwiches, toast creations, and comforting meals are built. The simple act of kneading dough, watching it rise, and finally, tasting the fruits of your labor is incredibly rewarding. The recipe itself is inspired by traditional European bread-making techniques, passed down through families and perfected over time. I’ve adapted it to be accessible and easy to follow, even for beginner bakers.
Why You’ll Love This Recipe
This classic homemade bread recipe is a game-changer for several reasons. First and foremost, it’s incredibly versatile. You can use it as a base for sandwiches, toast, or even as a side to your favorite soups and stews. Its neutral flavor profile makes it the perfect canvas for all sorts of culinary creations. Whether you’re craving a simple grilled cheese or a fancy avocado toast, this bread will deliver.
Beyond its versatility, this bread is also surprisingly nutritious. Made with simple, wholesome ingredients like flour, water, yeast, and salt, it’s a healthier alternative to store-bought breads that often contain preservatives and additives. Plus, the act of making bread yourself allows you to control exactly what goes into it, ensuring that you’re feeding yourself and your family the best possible ingredients.
Don’t let the idea of baking bread intimidate you! This recipe is designed to be easy and approachable, even for beginner bakers. With clear, step-by-step instructions and helpful tips, you’ll be able to create a beautiful loaf of bread that you can be proud of. The process is also incredibly therapeutic. There’s something deeply satisfying about working with your hands, kneading the dough, and watching it transform into something delicious.
Finally, let’s talk about flavor. The taste of freshly baked homemade bread is simply unbeatable. The subtle sweetness of the flour, the slight tang of the yeast, and the perfect amount of salt combine to create a flavor that is both comforting and complex. Once you’ve tasted homemade bread, you’ll never want to go back to store-bought again.
Ingredients
- 3 cups all-purpose flour
- 1 1/4 cups warm water (105-115 degrees F)
- 1 teaspoon salt
- 1 packet (2 1/4 teaspoons) active dry yeast
- 1 tablespoon olive oil
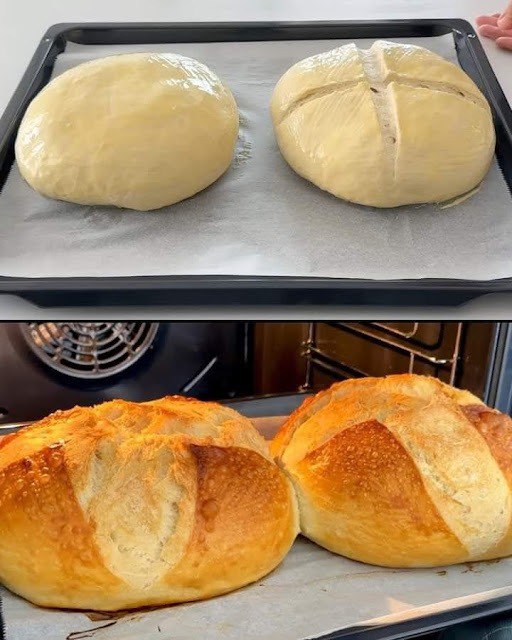
Step-by-Step Instructions
- In a large bowl, dissolve the yeast in warm water. Let it sit for about 5-10 minutes until it becomes foamy. This indicates that the yeast is active and ready to use.
- Add the salt and olive oil to the yeast mixture. Stir well to combine all ingredients.
- Gradually add the flour, one cup at a time, mixing well after each addition. Once the dough starts to come together, turn it out onto a lightly floured surface.
- Knead the dough for 8-10 minutes until it becomes smooth and elastic. If the dough is too sticky, add a little more flour, one tablespoon at a time.
- Place the dough in a lightly oiled bowl, turning to coat. Cover the bowl with plastic wrap or a clean kitchen towel. Let it rise in a warm place for 1-1.5 hours, or until doubled in size. The ideal temperature for rising is around **75-80 degrees F**.
- Punch down the dough to release the air. Shape it into a loaf and place it in a greased 9×5 inch loaf pan.
- Cover the loaf pan with plastic wrap or a clean kitchen towel. Let it rise again for 30-45 minutes, or until it has nearly doubled in size.
- Preheat your oven to **375 degrees F**. Bake the bread for 30-35 minutes, or until it is golden brown and sounds hollow when tapped on the bottom.
- Remove the bread from the loaf pan and let it cool completely on a wire rack before slicing and serving. This will prevent the bread from becoming gummy.
Expert Tips for Success
The key to a successful loaf of homemade bread lies in using the right ingredients and following the instructions carefully. Make sure your yeast is fresh and active. If it doesn’t foam when dissolved in warm water, it’s likely expired and won’t properly leaven the bread. Also, use a good quality flour for the best results. All-purpose flour works well, but you can also experiment with bread flour for a slightly chewier texture.
Temperature is also crucial when it comes to yeast. The water should be warm, not hot, as hot water can kill the yeast. Similarly, the dough needs to rise in a warm place. If your kitchen is cold, you can place the bowl in a slightly warmed oven (turned off, of course!) or near a radiator. Just be careful not to overheat it, as this can also inhibit the yeast’s activity.
Kneading is another important step in the bread-making process. It develops the gluten in the flour, which gives the bread its structure and texture. Be sure to knead the dough for the full 8-10 minutes, or until it becomes smooth and elastic. If you’re using a stand mixer, you can use the dough hook attachment to knead the dough for you.
Finally, don’t be afraid to experiment! Baking bread is a science, but it’s also an art. Once you’ve mastered the basic recipe, you can start adding your own personal touches, such as different herbs, spices, or even dried fruits and nuts. The possibilities are endless!
Variations and Substitutions
- **Whole Wheat Bread:** Substitute half of the all-purpose flour with whole wheat flour for a nuttier flavor and added fiber. You may need to add a little more water as whole wheat flour absorbs more liquid.
- **Herb and Garlic Bread:** Add 1-2 tablespoons of chopped fresh herbs, such as rosemary, thyme, or oregano, and 1-2 cloves of minced garlic to the dough during the kneading process for a savory twist.
- **Sweet Bread:** Add 2-3 tablespoons of sugar or honey to the dough for a slightly sweeter bread that’s perfect for French toast or cinnamon toast.
- **Seeded Bread:** Sprinkle the top of the loaf with sesame seeds, poppy seeds, or sunflower seeds before baking for added flavor and texture.
- **Sourdough Bread:** For a tangier flavor, try using a sourdough starter instead of active dry yeast. This will require a longer fermentation process, but the results are well worth it.
Serving Suggestions
This classic homemade bread is incredibly versatile and can be enjoyed in countless ways. For a simple and satisfying meal, try toasting a slice and topping it with avocado, a fried egg, and a sprinkle of salt and pepper. It’s also delicious with a smear of butter and jam, or as part of a grilled cheese sandwich. The possibilities are truly endless.
If you’re looking for something a bit more substantial, this bread makes a fantastic accompaniment to soups, stews, and salads. Its neutral flavor profile complements a wide range of dishes, and its soft texture is perfect for soaking up sauces and gravies. You can also use it to make croutons for salads or stuffing for holiday meals.
FAQs
Q: Can I use bread flour instead of all-purpose flour?
A: Yes, you can substitute bread flour for all-purpose flour. Bread flour has a higher protein content, which will result in a slightly chewier texture.
Q: How do I store homemade bread?
A: Store homemade bread in an airtight container at room temperature for up to 3 days. For longer storage, you can freeze it for up to 2 months. Slice the bread before freezing for easy thawing.
Q: My bread didn’t rise properly. What went wrong?
A: There are several reasons why your bread might not have risen properly. Make sure your yeast is fresh and active, and that the water is warm, not hot. Also, ensure that the dough is rising in a warm place, and that you’re not using too much flour.
Q: Can I make this recipe without a stand mixer?
A: Yes, you can definitely make this recipe without a stand mixer. Simply knead the dough by hand on a lightly floured surface until it becomes smooth and elastic.
Final Thoughts
Baking homemade bread is a truly rewarding experience. It’s a chance to connect with a tradition that spans generations, and to create something delicious and nourishing for yourself and your loved ones. Don’t be afraid to experiment with different variations and substitutions to find your perfect loaf. With a little practice, you’ll be baking beautiful, flavorful bread in no time.
So, gather your ingredients, put on your apron, and get ready to embark on a culinary adventure. I promise, the aroma of freshly baked bread wafting through your home will be well worth the effort. Happy baking!
Classic Homemade Bread
A simple and delicious loaf of bread, perfect for any occasion.
Ingredients
- 3 cups all-purpose flour
- 1 1/4 cups warm water (105-115 degrees F)
- 1 teaspoon salt
- 1 packet (2 1/4 teaspoons) active dry yeast
- 1 tablespoon olive oil
Directions
- Dissolve yeast in warm water, let sit for 5-10 minutes.
- Add salt and olive oil to the yeast mixture, stir well.
- Gradually add flour, mixing after each addition. Knead for 8-10 minutes.
- Place dough in oiled bowl, cover, and let rise for 1-1.5 hours.
- Punch down dough, shape into a loaf, and place in greased pan.
- Cover and let rise again for 30-45 minutes.
- Bake at 375 degrees F for 30-35 minutes until golden brown.
- Cool completely on a wire rack before slicing.